Store Manager for PrestaShop is a user-friendly and easy-to-use desktop application that can help you enhance and speed up your PrestaShop web shop performance. It provides online merchants with an arsenal of instruments necessary for convenient and effective business management. In order to take advantage of this solution, you need to start with PrestaShop Store Manager Setup. Below in this article you will find instructions on how to install the program and start operating with it. Store Manager software is approachable in installation and feasible in running. First of all you need to order Store Manager license key. Software download link and license key will be sent via e-mail. Download the application from the link sent via e-mail. Having downloaded the program, proceed with its installation. Store Manager Setup Wizard will guide you through standard steps of software installation. You can choose between Quick installation and Custom installation. In case you prefer Custom installation you should go through the following steps: Having chosen Quick installation you need to accept License Agreement and start installing pressing Install button. Once you are done with installation, you need to register application with License Key you were provided via e-mail. Input license number in Registration window. Store Manager licensing presumes that you are allowed to install, register and use only one copy of the software per license. Having purchased full version of Store Manager you get one Primary License, that can be used on one computer only. Whenever you need to use the program on other computers you can order Additional Licenses at reduced price. In case you face some issues with the registration, check the following articles:
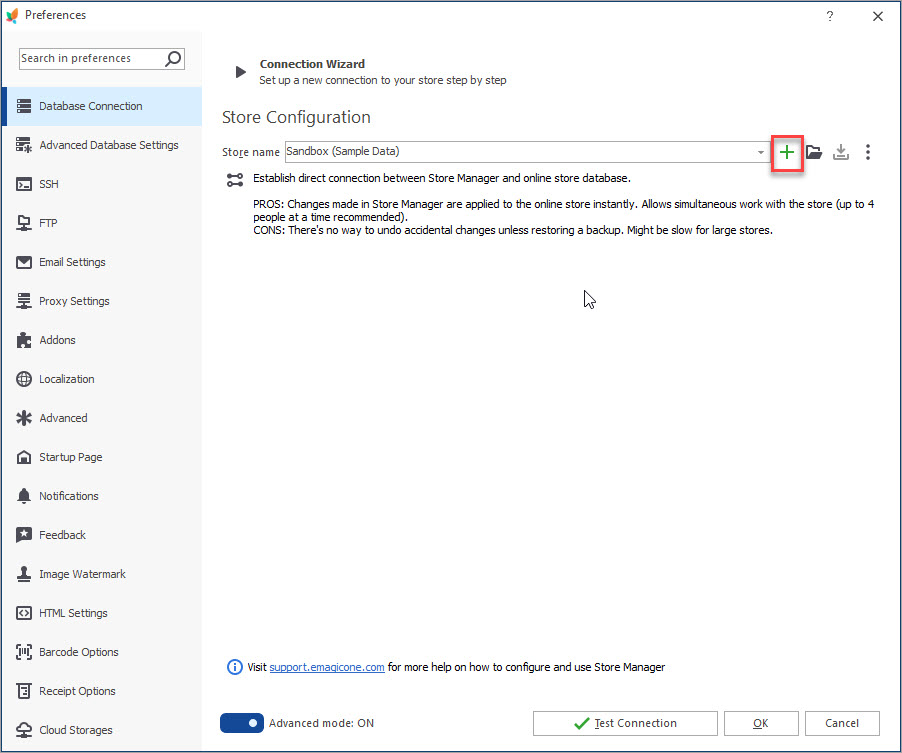
Having installed and registered the application, you have to set up connection to database you will work with. To accomplish it you need to designate connection settings. After this you can work with your live store. Whenever you want to explore the program’s features and functional capabilities you may work with temporary default Embedded database and sample data. To connect to your live store you must configure settings in corresponding tab (Database Connection) of Preferences form. To call up Preferences press F12 or go to Settings -> Preferences -> Database connection tab to proceed with setup. The easiest way is to use Connection Wizard – it allows to setup connection automatically. Please check the following steps Direct Connection – the type of connection that connects to the store’s database directly.
If you choose this type of connection, the wizard will proceed with the next steps. You can use Connection Wizard to configure direct connection to your remote database. Pease follow few steps:
Click the Test FTP connection button and if you receive the message “FTP was connected successfully”, proceed with the connection setup by clicking Next. On this page you have to specify Host address and Port, then press Next to proceed. Then, you shoud configure database user and password. Test Database Login and, if everthing’s ok, press Next to go to the next step. On this step you have to select a database. Fill in the name of the database or select one from the available. Press Next to proceed.
After a connection is established, you will see the summary of connection settings. Press Finish to close the wizard. Detailed information and instructions on how to set up each of connections mentioned manually or with the help of Wizard can be found here – Quick Start Guide, How to Connect to Store Manager for PrestaShop Easily And Swiftly Having accomplished PrestaShop Store Manager Setup and arranged settings described above, you may proceed with store data management and successfully develop your web site. Find out the ways to connect your store database to Store Manager and learn how to use Connection Wizard. Read More… Discover what import file formats are supported by PrestaShop admin and what import solutions are offered by Store Manager for PrestaShop. Read More… Get insight into main PrestaShop import options including import method, handling products not included in imported file, category options etc. Read More… Discover the ways to perform basic actions over your products including adding new items, modifying or removing them, assigning them to categories etc. Read More…PrestaShop Store Manager Setup

Store Manager Registration

Setting Up Connection to Store Database


Related Articles:
How to Connect Store Manager to PrestaShop Database
PrestaShop Import – Supported Formats
Import Products to PrestaShop using Store Manager
Basic Operations over PrestaShop Products
COMMENTS
Date: 2013-08-21 2013-08-21
Modified: 2026-05-06 2026-05-06
Store Manager for PrestaShop: Installation, Registration, Setup
Be the first to comment.

