This arcicle was originally written in May, 2017 and updated in April, 2020
PrestaShop Advanced Stock Management is a great tool for inventory management optimization. It allows store owners to use multiple sources of inventory and handle them in one place.
Advanced Stock Management allows you to indicate quantity for every product (combination) in your store, specify the warehouse in which the product is kept in (with multiple carriers), track inventory movements, product current status, etc.
Starting from version 2.22.1.1415 Store Manager for PrestaShop enhances Advanced Stock Management (further ASM) possibilities and brings new possiblities to inventory tracking via this tool.
Below you will find out how to set up advanced stock management in Store Manager for PrestaShop, how to assign PrestaShop products to Warehouses in bulk using Store Manager tools. Please note, that stock management system was rebuilt at PrestaShop, so for newer version this option is not available in Store Manager as well.
This tutorial covers ASM for PrestaShop 1.6.x. You will learn how to:
1. Enable the PrestaShop Advanced Stock Management Option
First of all you need to enable ASM at the PrestaShop admin side (until the option is enabled it is not active in Store Manager application). Follow these steps to enable ASM:
- Log in to your store admin panel.
- Navigate to the left side menu and find the Preferences option. In the drop-down menu find the Products. Click on it and scroll down to the Product Stock section on this page.
- Enable ASM. If necessary allow the system to associate all new products with ASM automatically and set default warehouse (after you create warehouses).

After you enable ASM in the PrestaShop admin correcponding tab should appear in Store Manager menu:

2. Add PrestaShop Warehouses
ASM can not be used for inventory tracking if no PrestaShop warehouse exists. Each product and combination should be assigned to a warehouse or warehouses. So the next thing you should get ready with is creating a warehouse.
- Open Warehouses section in Store Manager application.
- Press the Add Warehouse button on the toolbar.
- Insert all the details asked for the warehouse:
- Reference (unique identifier) and warehouse name
- Manager responsible for its running
- Select management type and stock valuation currency
- Physical address
- Assign carrier
- Link warehouse to a specific shop

Important:
- In case no carrier is associated with a warehouse, clients WILL NOT BE ABLE to purchase products this warehouse holds. A carrier is responsible for product shipping and cannot be missed.
- Shop association is important and defines which warehouse orders will be sent from for this or that shop. If you have more than one shop, link the warehouse to the necessary one/s.
- PrestaShop warehouse management type is the way of accounting evaluation and depends on selected country regulation. It CAN NOT BE CHANGED once the warehouse is created.
- Stock evaluation currency CAN NOT BE CHANGED once it is saved for the warehouse.
- A warehouse can only be deleted if there are no products associated.
3. Assign PrestaShop Products to a Warehouse
PrestaShop merchandise will be tracked via Advanced Stock Management if your products (and combinations) are assigned to warehouses. Store Manager offers you regular manual method of assigning products, bulk assigning of products through the lower grid and assigning products via import. Let’s review each method in detail.
Assigning Products to a Warehouse Manually
If there are just a few products missing a warehouse and you can assign each product to a warehouse one by one:
- Select a product or its combinations in the grid.
- Click the Warehouse tab in the lower grid.
- Select a check box next to the approproiate warehouse.
- Apply the changes.

Bulk Assigning of Products to a Warehouse
If you need to assign several products from a category to a warehouse or warehouses you can do it through the lower grid in Store Manager application.
- Select the products which should be assigned to PrestaShop warehouses.
- Open the Warehouses tab in the lower grid.
- Select check boxes for the products under the warehouse they should be assigned to:

Use Store Manager for PrestaShop for more effective Advanced Stock Management
Try FREE nowAssigning Products to Warehouses via PrestaShop Import
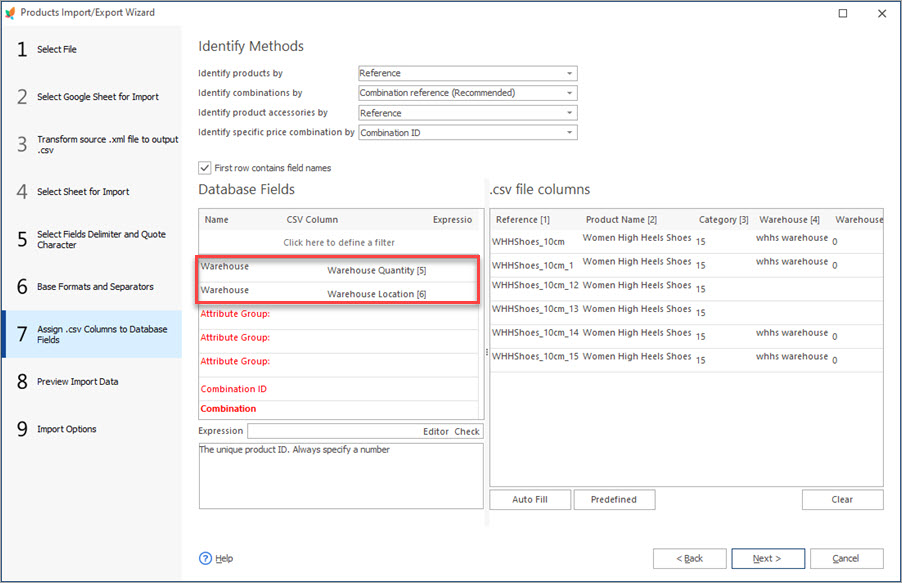
Another way of associating products to a warehouse in bulk is product import. When uploading products to your store you can create warehouse associations as well.
Besides the details related to a product, your import file should include a Warehouse column that contains a warehouse name. If an item should to be assigned to more than one warehouse you must input each warehouse in a separate row under the same product (See the screenshot of the sample import file):

Configure the settings within the Product Import Wizard paying attention to the mapping of fields. Columns from the file that list warehouses should be assigned to the corresponding database fields. Do not forget to select suitable product identifier.

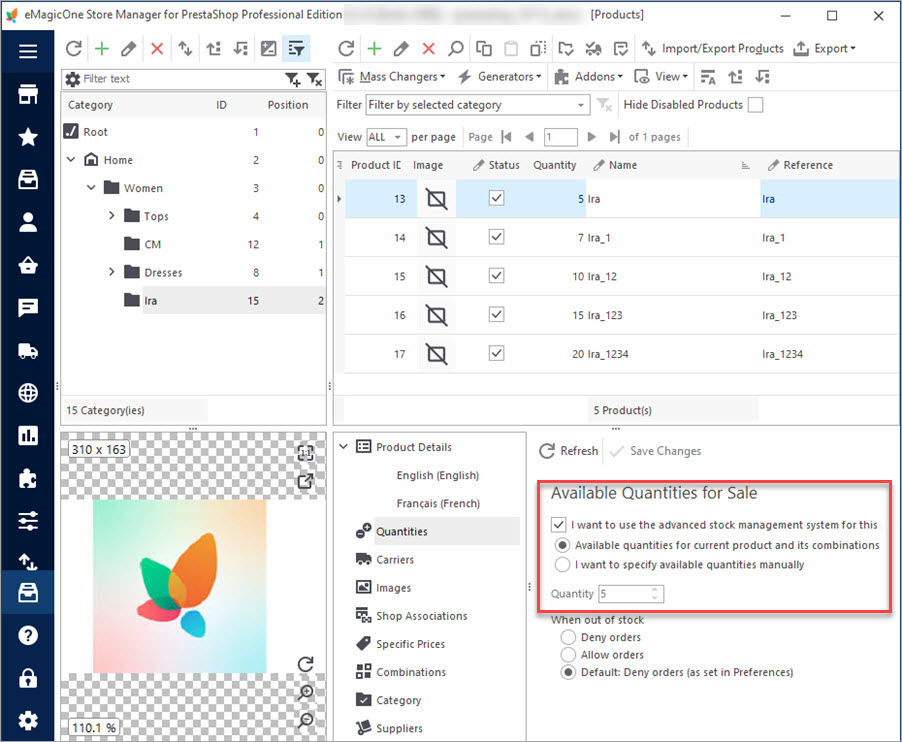
4. Allow Stock Management for PrestaShop Products
In order to handle all product quantities via PrestaShop Advanced Stock Management rather than in usual way, you have to enable system for these items.
- Select the products in Store Manager application.
- Navigate to the lower grid the Quantities tab.
- I want to use the advanced stock management system for this product
- Available quantities for current product and its combinations are based on warehouse stock
- I want to specify available quantities manually
The option I want to specify available quantities manually is enabled by default. It is responsible for manual quantity adjustments and, respectively, prevents handling PrestaShop inventory with the Advanced Stock management system.

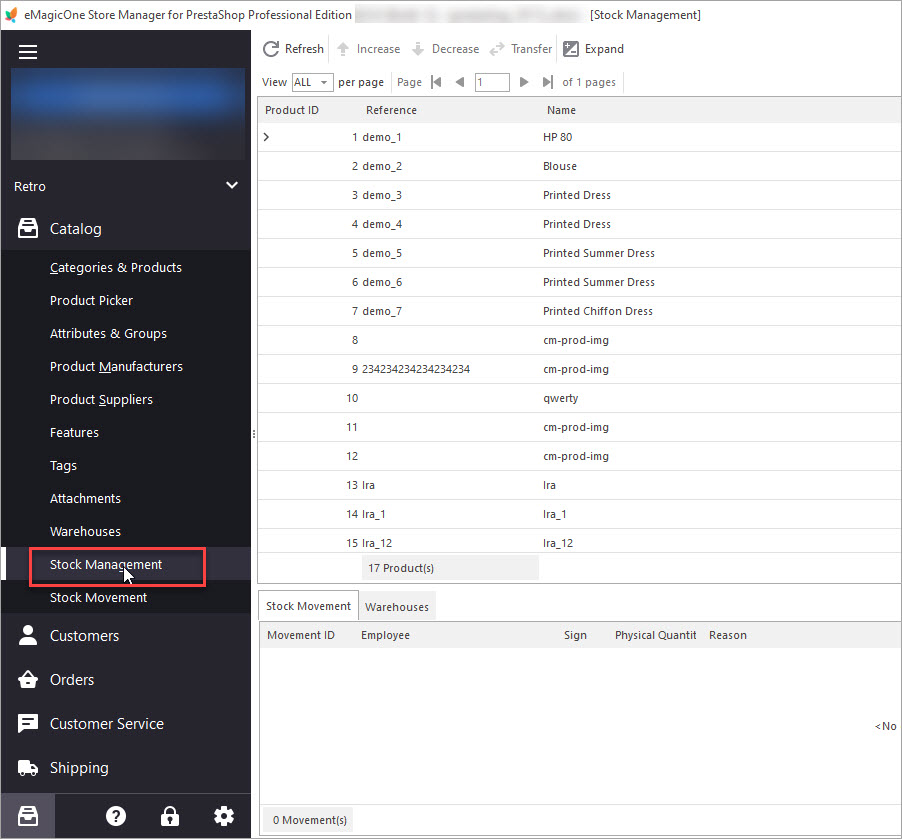
5. Add Stock to a PrestaShop Warehouse
Now product quantities will be managed and tracked through ASM, since you have enabled it on the previous step. Let’s add stocks to the warehouses.
- Open Stock Management section in Store Manager. This section keeps all the products and combinations you have at your online store.
- Select a product or combination (expand product rows to get a list of combinations it has) and click the Increase button either on the toolbar or in the context menu.

Special Stock Management window appears. In this window you can add quantity to a certain warehouse.
Remember:
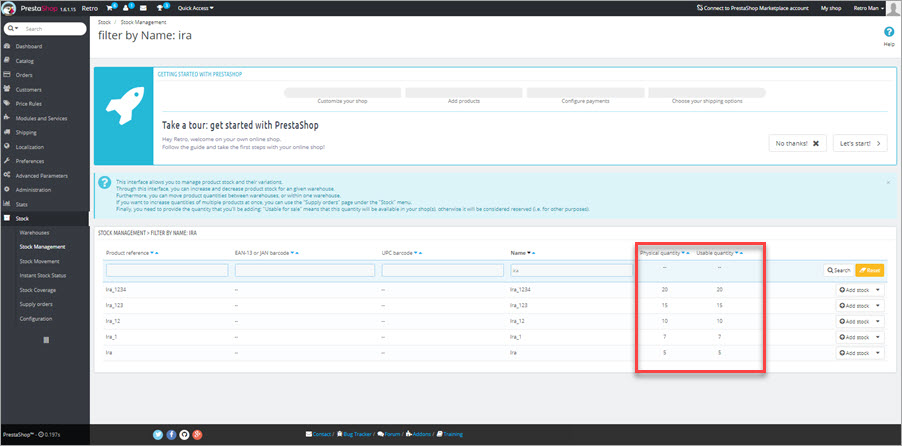
PrestaShop deals with two notions:PrestaShop quantity available for sale and Physical quantity. You should differentiate them if you manage PrestaShop inventory with the Advanced Stock Management.
PrestaShop quantity available for sale (Usable quantity) is the number of products displayed in a shop for each product and product combination. It defines whether the product can be ordered or not (in case Allow ordering out-of-stock products option is not enabled). If you disable this option the quantity you add, won’t be available for purchase, but stored for other purpose.
Physical quantity is an inventory stored physically though not available for purchase.
- If the quantity you add for a selected product should be available for ordering you need to check the Usable for sale option. If you disable it the quantity will be added to a physical merchandise. Let’s see the examples.
To add the quantity for sale check this option and provide quantity in the field above.

After the quantity has been added we can see the figures in Store Manager: physical quantity=850 and usable quantity=720.

Now you can add physical quantity to the same product disabling Usable for sale checkbox.

After the update usable quantity remains the same though physical quantity has increased.

Important:
If a product belongs to several warehouses first select appropriate warehouse from the dropdown.
Quantity can’t be decreased via the Increase option providing minus value there. You should use the Decrease option also available on the toolbar or in the context menu.
6. Remove Stock from a PrestaShop Warehouse
When for some reason you need to subtract product quantity in some warehouse you can do it manually via the Decrease option.
- Open Stock Management section.
- Select a product whose quantity must be reduced and the click Decrease option either on the toolbar or in the context menu.
- Indicate the quantity to remove, an employee who is updating the inventory, and a warehouse (if this products is available in several warehouses).

Remember:
If you enable the the Usable for sale option, the quantity you provide will be taken away from the physical product quantity. To reduce usable quantity by the value specified, select the Usable for sale check box.
Let’s first remove the quantity from physical stock. We do not check Usable for sale option. Physical quantity is 1000 and usable quantity is 770 at the moment. We are going to remove 100 items from the physical stock.

After the update we have 900 items in physical stock and the same 770 items in usable one.

How is usable merchandise decreased? Now we check the Usable for sale button and provide 50 in the Quantity to remove field.

Both, physical and usable for sale quantity have reduced as physical quantity consists of usable and physical stock.

Here is another example of how PrestaShop stock can be reduced after an order had been created. Let’s create an order with the Store Manager for PrestaShop POS tool.
- Start POS under Orders section -> Point of Sale.
- Select a product (or scan its code) to be added to the order.
- Select a customer, payment and delivery details, order status and create an order.


Now let’s set the order as delivered and check stock movements.

As you can see, the product has appeared under label Customer order, its stock has decreased by 1 item.
7.Track Stock Movements
All PrestaShop stock changes, be it merchandise replenishment, decrease, transfer between warehouses are recorded in Store Manager. Thus you can check how quantities are migrated anytime. Here is how to find this information.
In the Stock Management section (Stock Management)
Select a product(s), for which you want to analyze stock movements and navigate to the lower grid. It contains two tabs – Stock Movement and Warehouse, where you can respectively check product(s) physical quantity changes and warehouses, selected product is associated with.

In the Stock Movement section (Stock Movement)
There are all product stock movements in Stock Movements section. Each stock change is recorded for each product, so you can instantly get an idea of how quantities moved (increased, decreased or moved from one warehouse to another).
Store Manager provides all the possibilities for convenient PrestaShop stock movements analyzing.

Movements can be filtered by warehouses, what allows you to investigate stock movements by specific warehouse.

Movements can also be rearranged pressing any grid column heading – in descending or ascending order if the field is numeric, like product price, quantity, ID or alphabetically (vice versa).

In order to quickly reach necessary movement you can make search more precise, customize it using some search parameter. Hit an arrow beside any column name, choose Customize option and provide value to search stock movement.

This is how Advanced Stock Management functions and how Store Manager simplifies PrestaShop inventory handling if this option is enabled.
Use Store Manager for PrestaShop to perform bulk updates and simplify Advanced Stock Management
Try FREE now!Related Articles:
How to Enable Advanced Stock Management
Find out how to bulk add products to Advanced Stock Management system and what this system involves. Read More…
Products Are Out of Stock after Enabling ASM
Why products become out of stock and how to fix it? Read More…
Update PrestaShop Warehouse Stock Via Import
Get step-by-step instructions of executing PrestaShop warehouse update by import. Read More…
How to Transfer Stock Between PrestaShop Warehouses
Get detailed guides on how to smoothly transfer inventory to another PrestaShop store. Read More…
COMMENTS

