If you want to massively add or update products, categories, or other entities to PrestaShop you will consider using the PrestaShop import tool.
For the import to be successful, you need to configure your file properly. And the first step to do so is to get a PrestaShop import file sample and prepare your file by analogy.
In this article, you’ll learn where you can download the PrestaShop CSV import sample (or any other version you are using), how to populate the file with your data, and how to make the import process faster and error-free.
Where to Download the PrestaShop Import File Sample?
PrestaShop provides sample CSV sample files in the backoffice.

The platform offers sample CSV files for each type of entity that can be uploaded via import:
- Categories
- Products
- Combinations
- Customers
- Addresses
- Brands
- Suppliers
- Alias
- Store Contacts
For every entity, the list of fields will be different. When you expand the drop-down and select what you want to import the list of available fields appears on the right:

How to Open a PrestaShop CSV Import File Sample?
The downloaded file will have the CSV extension. The data in the file can be viewed with a text editor like Notepad++ or a spreadsheet program like Microsoft Excel or OpenOffice Calc.
Trying to open the file with Google Docs you will find that the file isn’t parsed correctly. That’s because Google Spreadsheets can “understand” only the comma (,) as a delimiter, while in the PrestaShop sample CSV file they use a semicolon (;) to separate fields.
So to edit the PrestaShop CSV sample file you will need the program which allows you to select a delimiter (Excel, OpenOffice Calc).
If you, though, want to use Google Spreadsheets to prepare the file, then during import to PrestaShop select the comma (,) as a delimiter.
Here is, for example, how to open the file using OpenOffice Calc: select the semicolon delimiter, uncheck the “Space” checkbox and select the UTF-8 character set:

What Columns Should Be included in the PrestaShop Import File?
When you have opened the sample file you will see all available and required fields (marked with an asterisk). Also, there will be some products to show you how to fill in the data in the file:

Why does the file contain so many fields? Because it shows all available fields. For example, the Product_import file contains fields for importing different product types, special prices, and others. If you don’t have the data to fill in there – it’s OK. Just remove unnecessary fields from the file and leave the fields you want to upload. Basically, there is only one required field for product import – Name.
Steps to Prepare the File in the Prestashop CSV Import Format
So if you want to upload new products (or other entities) to PrestaShop the plan would be as follows:
- Download and open the sample file as described above.
- Remove unnecessary columns and sample records.
- Fill in your data: product name, description, category ID (Note: categories must be added beforehand), price, quantity, and others.
- Save the file, selecting the CSV extension (if you are using OpenOffice Calc, select “Keep current format”). Make sure you save it with UTF-8 encoding. (If you edited the file with Excel, open it afterward with Notepad++ save it with UTF-8 encoding).
- Go to the PrestaShop back office and upload the file.
How to Make PrestaShop Import from .csv More Approachable?
When using the default PrestaShop CSV import tool, you will face a few inconveniences:
- It takes a long time to configure the CSV file according to the requirements (you might even get an error trying to import the PrestaShop sample file).
- It is not possible to make adjustments during import, for instance, assign products to another category, change product price, etc.
The import tool in Store Manager for PrestaShop eliminates all these inconveniences. It offers the flexibility to import files in different formats, structure, and edit them on the go:
- No strict requirements for the file. Changes or missing data can be applied on the fly.
- Import of CSV, TXT, XML, XLS file formats is supported.
- Upload products and orders from Google Sheets.
- Assign combinations and features having them in the same import file.
- Import from different file sources (local file, HTTP, or FTP URL).
Here is how it looks step by step.
- Download and install free trial version of Store Manager for PrestaShop.
- Connect the application to your store database using the wizard inside it.
- Prepare the file you are going to import:
- Create or import categories to import products to.
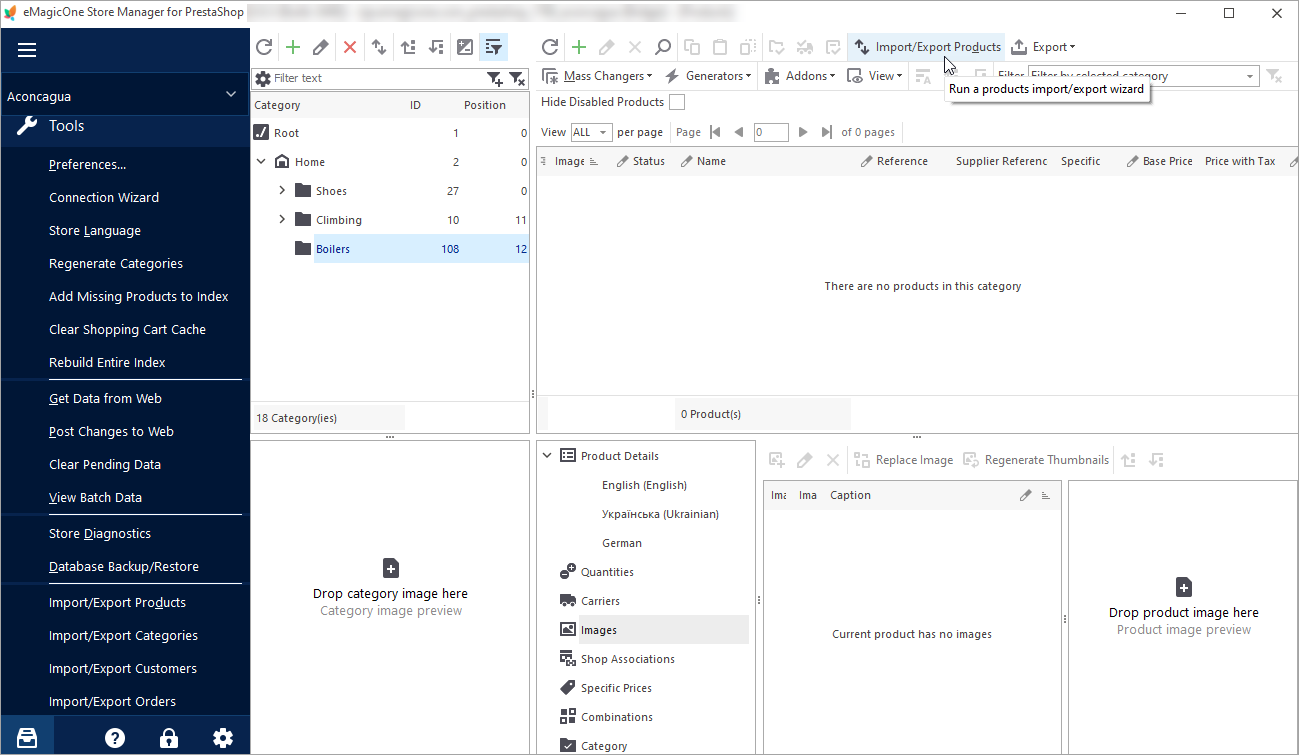
- Run the “Import/Export Products” tool:
- Select the “Import” option to launch the Import Products Wizard and follow the prompts to upload the products successfully:
When the connection is established, you will see your category tree displayed in Store Manager. In the “Tools” menu you can see what entities can be imported and exported:


We’ve already created a new “Boilers” category and now will import products there.

Importing Products to PrestaShop Using Store Manager Import Wizard
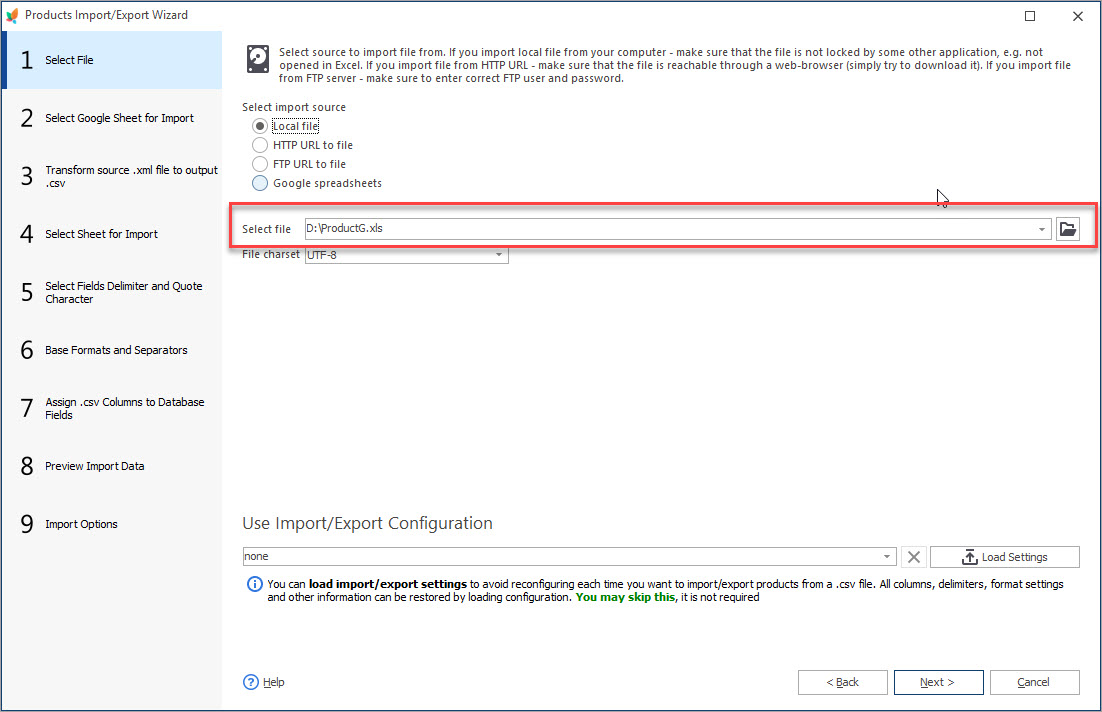
On the first step, we specify the source of the import file. In our example it’s a local disk:

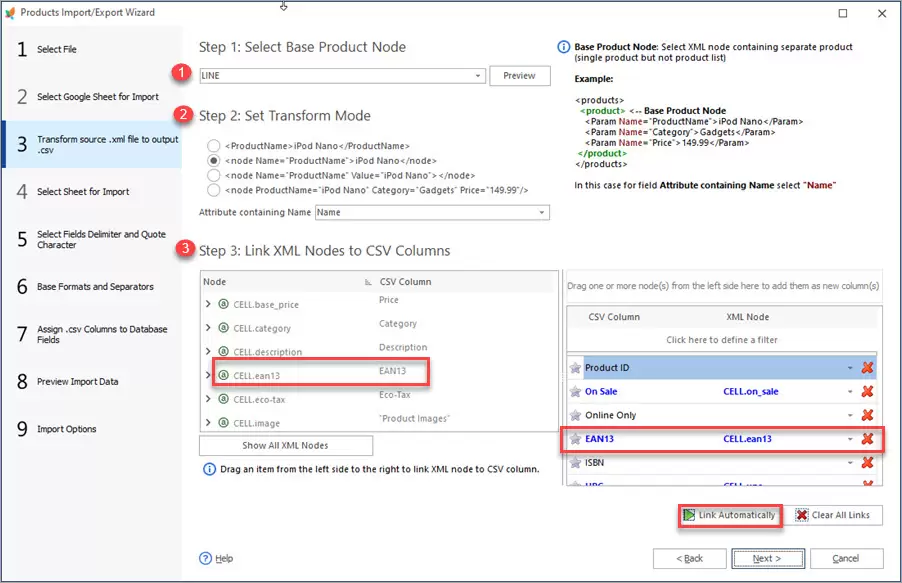
On the next step, we select the delimiters and quote characters that are used in the file: semicolon to separate fields data, comma to separate categories in a category tree. As we are going to import images we’ll check the corresponding option.
The preview shows that we selected the proper delimiters and the file was parsed correctly:

In this window, the Wizard prompts us to specify date formats and separators. As we don’t use dates and time in our file we can skip these settings and press “Next”:

In this step, you can also select the methods to:
- Identify products and combinations – by Reference and Product Name, Product ID, EAN or UPC, Supplier Reference; (these settings are useful when you are updating existing products via import).
- Identify product accessories – by Reference or EAN13.
- Identify specific price combinations – by Combination ID, Reference, EAN13, UPC.
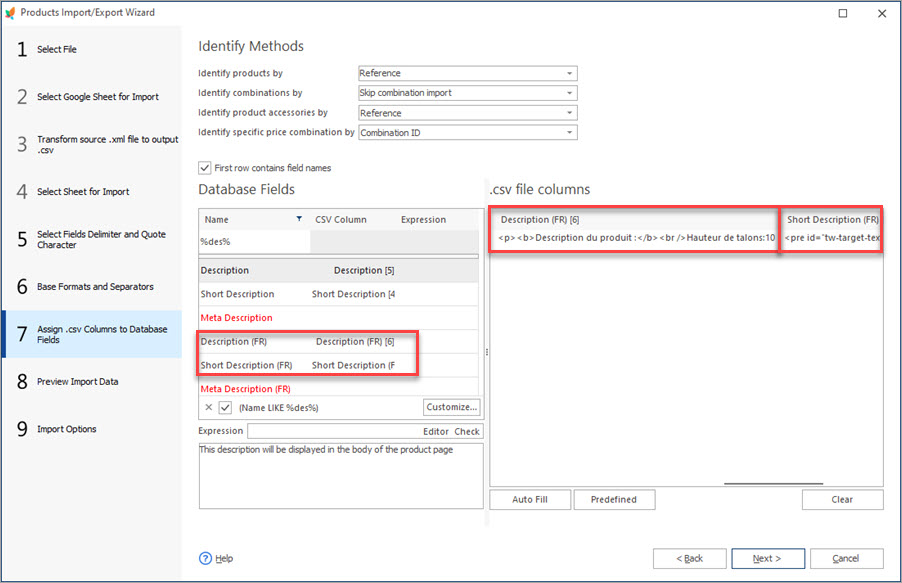
Now we’ll map the database fields to the columns in the file. For this we’ll select a database field on the left and assign a proper column from our CSV file:

On this step, we can check if the columns were mapped correctly. In this window, it is also possible to select the lines to import products from:

In this step there is a list of options that make your import really flexible:

After specifying all options we press “Import” and close the Wizard. As you can see, the data was successfully imported in Store Manager.

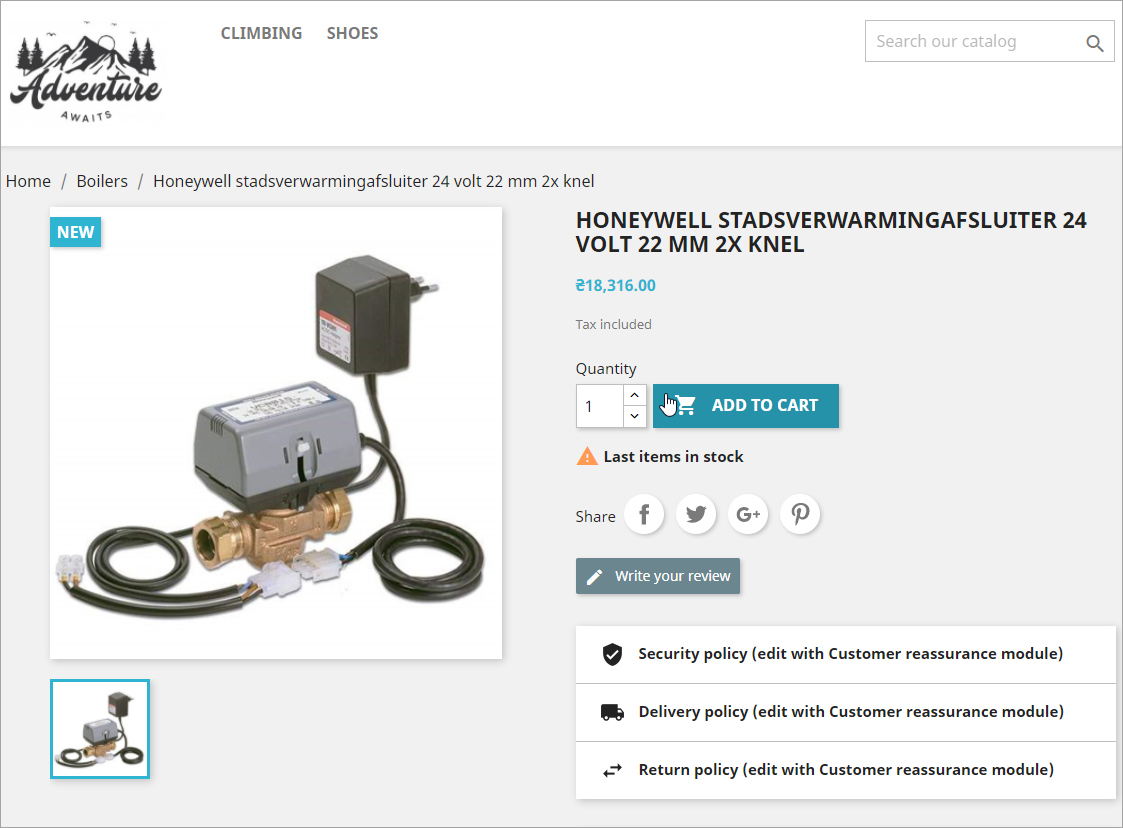
Let’s click one of the added products and check it at the storefront:

As you can see, the product was added and now is available for purchase:
Try Store Manager for PrestaShop and its Import Wizard to import categories, products, customers, and orders hassle-free!
Import categories, products, customers, and orders smoothly with Store Manager for PrestaShop
Import Now
Related Articles:
How to Import PrestaShop Products Into Specific Shops?
Configure settings for importing products into multiple PrestaShop stores at one stroke. Read More…
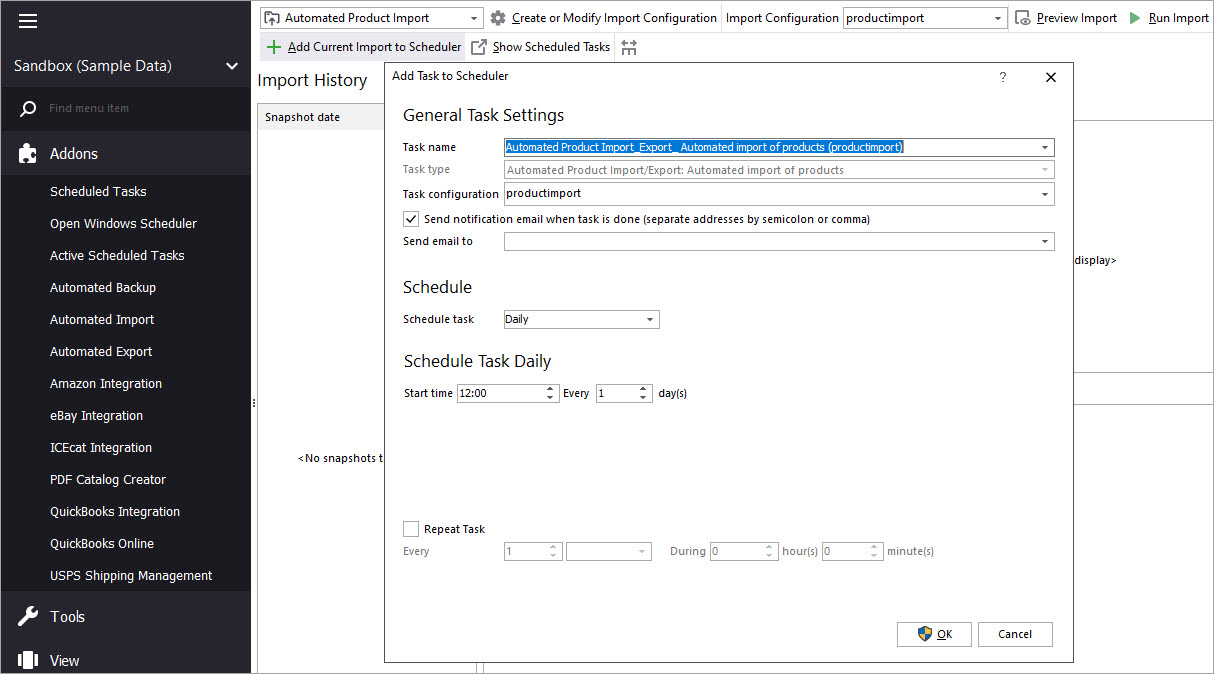
Make Your PrestaShop Product Import Automated
Discover the benefits of automated product import and the way to set it up. Read More…
How to Upload Excel Files to PrestaShop?
Import store data to PrestaShop in Excel format. Get full instructions. Read More…
Store Manager Extends its Potentials with XML File Import
Find out how to perform PrestaShop import of XML file and what XML import options are available in Store Manager. Read More…
COMMENTS

